
New ways to manage your hard drive space with the Autodesk Desktop Connector
Disc Space – the ongoing battle:
A lot of us are struggling with rapidly filling hard drives. Operating Systems and Applications are getting bigger on every release and, on top on that, there’s all the files we have to download and create for our Projects.
Optimising hard drive space with the Desktop Connector:
In the past, anyone using the Autodesk Desktop Connector to cache Project Files locally on their system could start to chew through hard drive space.
Thankfully, Autodesk has responded to feedback about this and the current version of desktop connector now supports an opt-in approach to syncing Projects and Files locally. You now need to elect which BIM360 / ACC Projects you want to Sync rather than having every Project end up on your PC. And to optimise thing further you can even elect to only sync some Folders and Files in that Project too.
Great, but I need more space:
If things start to become really problematic then more recent versions of the Desktop Connector have an option to move the location of the locally synced files to your larger hard drive. In Autodesk terminology, this is referred to as “Changing Workspaces”.
Just before we go forward, I would not recommend moving the DOCs folder to an external hard drive, in fact, in general terms, I wouldn’t really recommend moving any “live” file to an external hard drive as this can come with a host of potential issues down the track. But assuming you have a secondary hard drive, here is the process:
The process:
- Desktop Connector must have read/write access to the folder (directory).
- The folder (directory) must be on a permanent local storage drive.
- Desktop Connector must be online (not in Work Offline mode).
- Desktop Connector must not have any actions which are still processing.
If these requirements are not met, Desktop Connector will continue using the old workspace until the requirements are resolved and Desktop Connector is restarted.
Initiating a Workspace Change
- Click the Desktop Connector tray icon
 to open the home screen.
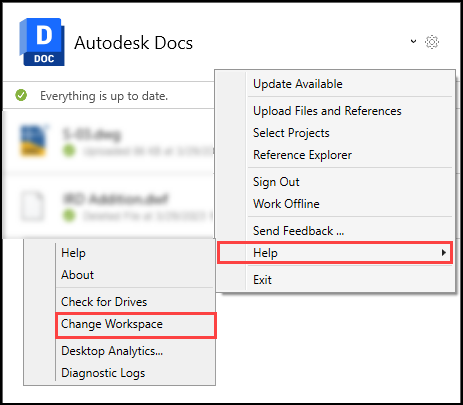
 - Click the cog icon and select Help -> Change Workspace from the menu.
Note: If you have NOT deselected your projects you will receive the following warning.
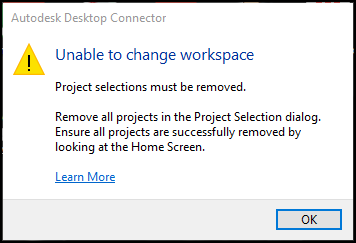
After you have deselected your projects continue to Step 3 and resume the Change Workspace procedure.
- Select your new workspace location in line with the Change Workspace Requirements which will then show a dialog box to confirm that you would like to change this location.
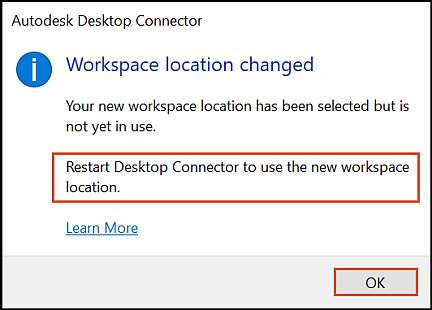
- Restart Desktop Connector.
After restarting, Desktop Connector will verify that the Change Workspace Requirements are met before using the new workspace.
Important: If Desktop Connector is unable to find the new workspace at startup time (this can be due to the location folder being deleted) then Desktop Connector will fail to start. To resolve this issue, the directory’s path will need to be re-created for Desktop Connector to successfully start.
Conclusion:
The newer builds of Desktop Connectors have some great features to help you manage hard drive space whilst staying synced to your Projects. Selective Folder Syncing and moving your local cache will take the strain off your primary hard drive.
